透過 GitHub Action 自動執行 DocSearch 的爬蟲
前言
經過好幾天的等待,Algolia 總算幫我開通了使用爬蟲的功能。
不過,事情進行的和我想像中的有著不小的落差:
-
Algolia 幫我建立了另外一個 Application,而不是幫我自己建好的 Application 原地升級。
-
因為是新建的 Application,所以 Index 也是新的。
-
Algolia 幫我新建的 Application 和 Index 都不能重新命名。
-
Algolia Scraper 只能運作在他們幫我新建的 Index 上,就算在他們幫我建出來的 Applicaion 中建新的 Index 也不能套用 Scraper。
-
如果要調整 Scraper 的設定的話,得要再上 Algolia Scraper 的 Web Console 修改。
-
Algolia Scraper 會定期執行(最短是每天執行一次),
基於上述幾點原因,我只好想辦法繞路讓每次有新文章發佈的時候就能自動爬一次 Index。
最直覺的想法就是,如果能透過 GitHub Action,在網站發佈自動自動執行 DocSearch Scraper,不就能解決我的問題了嗎?
踩雷
在拜谷歌大神的過程中,我參考了幾篇文章的作法,不過都以失敗作收。
這邊列出我試過的方法,有興趣的同學也可以試看看。
-
构建更优的 GitHub Action 完成 Algolia 数据上传
- 我遇到的問題是:透過 algolia cli 去執行
algolia import -s $FILE_PATH -a $APPLICATION_ID -k $ADMIN_API_KEY -n $INDEX_NAME之後會��噴錯,然後還是很開心的印出🚀 Successfully uploaded!。
- 我遇到的問題是:透過 algolia cli 去執行
-
Algolia DocSearch Scraper in Docker for GitHub Actions
- 我沒真的試過這個作法,主要原因是因為我不想把設定值那一大串 JSON 直接寫在 Action 裡,感覺還是獨立成一個 JSON 檔比較舒服。
最終採行方案
最後我還是用了最接近 Algolia 官方建議的作法,直接用 Docker 來執行爬蟲。
只需要在原來的 GitHub Workflow 中加入另一個動作就行了,作法詳列如下:
在 GitHub Repo 中加入 GitHub Action Secrets
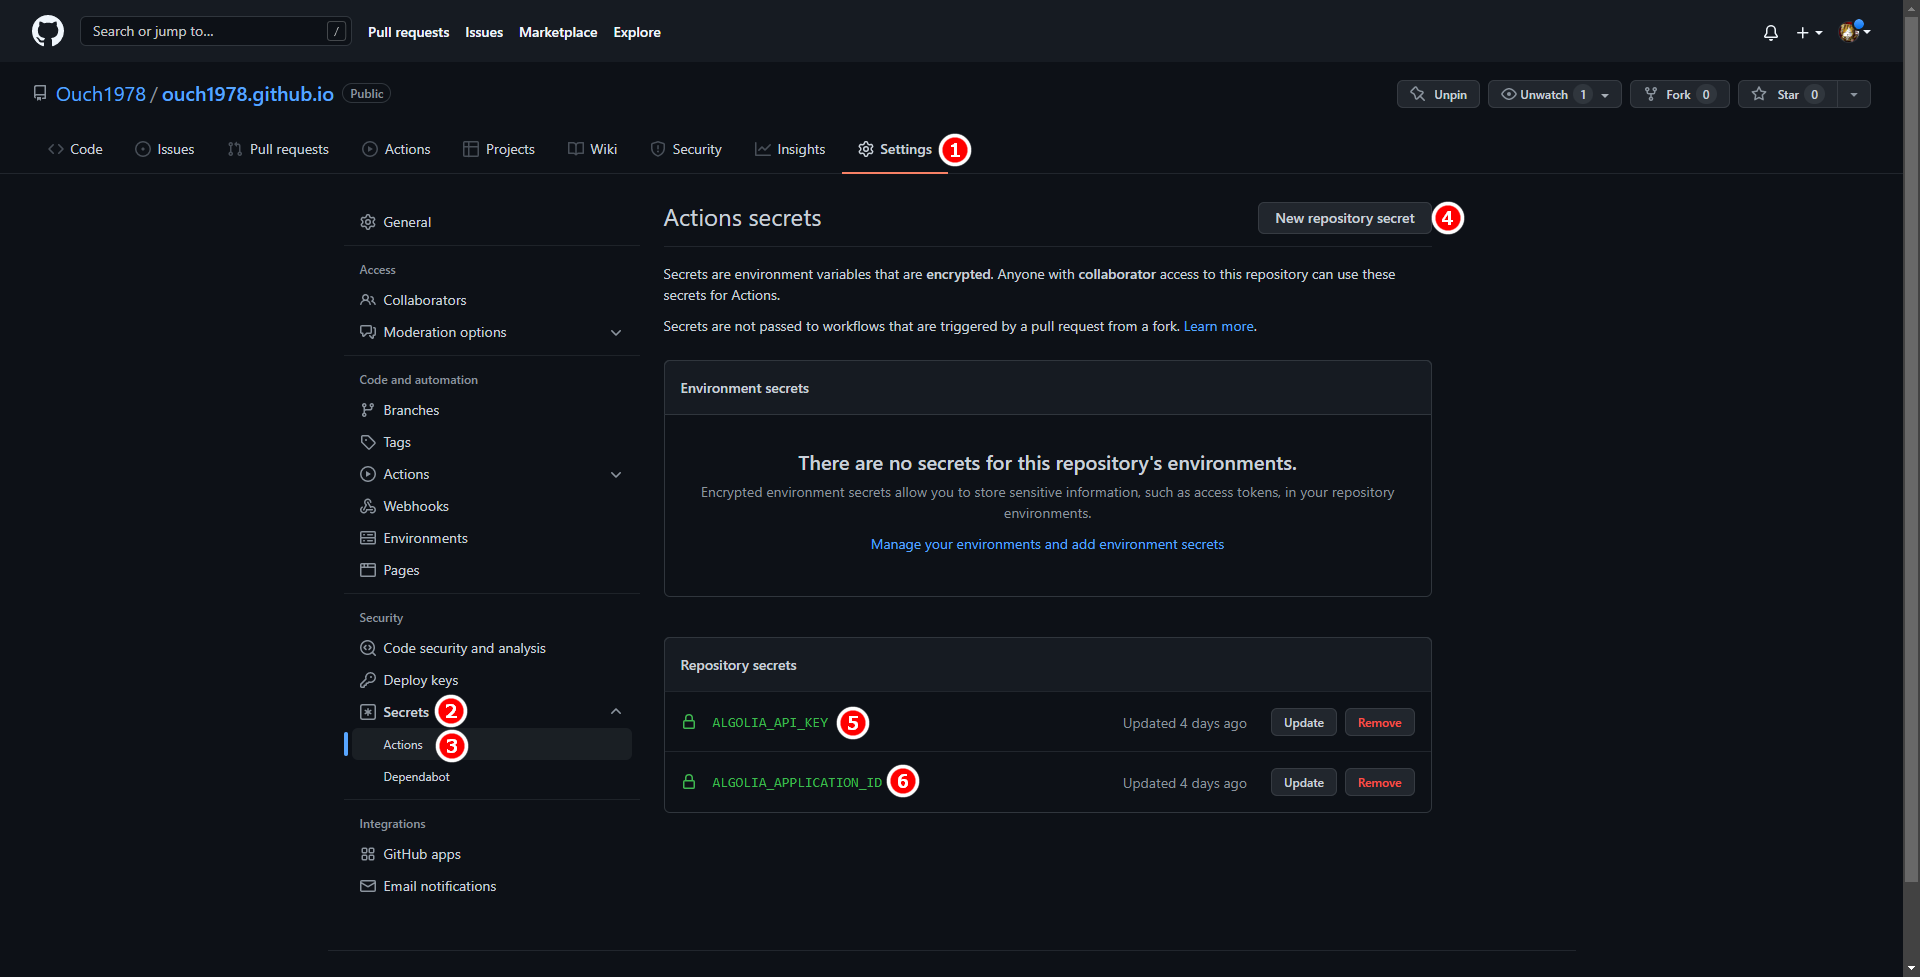
在 GitHub Repo 中點選 Settings ① -> Secrets ②-> Actions ③-> New repository secret ④,依序建立名為 ALGOLIA_API_KEY 與 ALGOLIA_APPLICATION_ID 的 Key,並且將你的 Algolia Admin API Key 和 Algolia Application Id 輸入。

建立完之後應該會出現上圖的 ⑤ 和 ⑥。
在專案中加入 DocSearch Scraper 的設定檔
我的作法是在 .github 下建立一個名為 scrapeConfig 的資料夾,並且在裡面新增一個 JSON 檔,名稱和內容如下:
{
  "index_name": "ouch1978.github.io",
  "start_urls": ["https://ouch1978.github.io/"],
  "sitemap_urls": ["https://ouch1978.github.io/sitemap.xml"],
  "sitemap_alternate_links": true,
  "stop_urls": [],
  "selectors": {
    "lvl0": {
      "selector": "(//ul[contains(@class,'menu__list')]//a[contains(@class, 'menu__link menu__link--sublist menu__link--active')]/text() | //nav[contains(@class, 'navbar')]//a[contains(@class, 'navbar__link--active')]/text())[last()]",
      "type": "xpath",
      "global": true,
      "default_value": "Documentation"
    },
    "lvl1": "header h1",
    "lvl2": "article h2",
    "lvl3": "article h3",
    "lvl4": "article h4",
    "lvl5": "article h5, article td:first-child",
    "lvl6": "article h6",
    "text": "article p, article li, article td:last-child"
  },
  "strip_chars": " .,;:#",
  "custom_settings": {
    "separatorsToIndex": "_",
    "attributesForFaceting": ["language", "version", "type", "docusaurus_tag"],
    "attributesToRetrieve": ["hierarchy", "content", "anchor", "url", "url_without_anchor", "type"]
  }
}
在 GitHub Workflow 加入執行 DocSearch Scraper 的 Action
將 GitHub Workflow 調整如下:
name: Deploy to GitHub Pages

on:
  push:
    branches:
      - main
    # Review gh actions docs if you want to further define triggers, paths, etc
    # <https://docs.github.com/en/actions/using-workflows/workflow-syntax-for-github-actions#on>

jobs:
  deploy:
    name: Deploy to GitHub Pages
    runs-on: ubuntu-latest
    steps:
      - uses: actions/checkout@v2
      - uses: actions/setup-node@v3
        with:
          node-version: 16.x
          cache: yarn

      - name: Install dependencies
        run: yarn install --frozen-lockfile
      - name: Build slides
        run: yarn reveal
      - name: Build website
        run: yarn build

      # Popular action to deploy to GitHub Pages:
      # Docs: https://github.com/peaceiris/actions-gh-pages#%EF%B8%8F-docusaurus
      - name: Deploy to GitHub Pages
        uses: peaceiris/actions-gh-pages@v3
        with:
          github_token: ${{ secrets.GITHUB_TOKEN }}
          # Build output to publish to the `gh-pages` branch:
          publish_dir: ./build
          # The following lines assign commit authorship to the official
          # GH-Actions bot for deploys to `gh-pages` branch:
          # https://github.com/actions/checkout/issues/13#issuecomment-724415212
          # The GH actions bot is used by default if you didn't specify the two fields.
          # You can swap them out with your own user credentials.
          user_name: github-actions[bot]
          user_email: 41898282+github-actions[bot]@users.noreply.github.com

      - name: Run DocSearch Scraper
        env:
          APPLICATION_ID: ${{ secrets.ALGOLIA_APPLICATION_ID }}
          API_KEY: ${{ secrets.ALGOLIA_API_KEY }}
        run: |
          docker run \
          -e APPLICATION_ID -e API_KEY \
          -e CONFIG="$(cat .github/scrapeConfig/docusaurus-v2.json)" \
          algolia/docsearch-scraper
還是要推一下 Algolia
雖然說我的網站套用 Algolia 之路走得不太順利,不過大部份的問題應該還是得算在我自己頭上。
誰叫我一開始不乖乖照著 Docusaurus 官方建議的方法提出申請呢?
還好 Algolia 還是很佛心的針對無付費的用戶提供索引和搜尋的服務,而且提供 API 讓我可以自己呼叫。
我個人的體驗,使用無付費的版本,在功能和整個的客製化支援程度上並不比升級 Premium 來得差,甚至有過之而無不及。
這麼佛心的服務,還是要推一下的啦!!~